Wednesday, June 26, 2019

DIY - Wood Pallet Pool Noodle Storage


If you have a swimming pool at your house, you probably have more pool noodles than you know what to do with. Actually, you might not have a pool at all and still have a surplus of these handy little noodles. They are inexpensive and I have seen them used in a variety of projects and hacks. As a matter of fact, when I’m done writing this post, I think I need to run to the store to buy some more of these wonderful noodles! Anyway, I do have a swimming pool at my house and I got tired of seeing these noodles thrown all around the yard or worse, left floating in the pool. (If you have ever reached for a pool noodle that has been left floating in pool water overnight, you will know what I’m talking about.) I mean, if you have been thinking about starting your own insectarium at home, then stop reading right here. This post is useless to you. Just leave your noodles floating in the pool tonight and by morning you will have gathered enough insects to start your new business. 
But if you’re like me, and your rather let the insects be free, far, far away from your swimming pool, then you need a storage solution for your pool noodles.
If you search for ‘Pool Noodle Storage’ on Pinterest, you will find a number of great ideas, some that are just simple and functional, others that double as cute backyard decor while still serving their purpose. I pinned a bunch of options that appealed to me and ultimately combined them to create my own one of a kind storage solution. 
If you want to make your own, the first thing you’ll need is a wood pallet. Wood pallet projects have also become so popular that I’m sure you already know that you should be able to get one for free if you just know where to go. If you don’t, ask around. A lot of businesses receive shipments on wood pallets and then they throw the pallets out to the dumpster. The next thing you’ll need is some pretty paint colors. I was lucky that when I did this project (years ago), I came across some small pre-mixed paint colors on clearance at my local Walmart. I honestly can’t remember for sure, but I think the paint I purchased was meant for indoors. But because the pallet was free and the paint was on clearance, I didn’t worry too much about it. I just figured I’d give it a shot and if it didn’t last, it would be a lesson learned. The other supplies I used were some basic paint brushes, a couple of inexpensive, reusable plastic sheet stencil sets and some foam brushes. Once I had all my supplies gathered, I got to painting. You can mix yours up anyway you want, but I’m a bit obsessive about symmetry and evenness and my pallet had six bigger wood panels across the front and one smaller panel across the center. To give each of the colors equal visibility on the pallet, I chose to do two larger panels in each of three of my colors and the color I chose for the center smaller board became the color for the sides of the pallet as well. Once the paint on the pallet had dried, I went to work stenciling the letters individually to make the cute little sayings on each panel. Again, with these sayings, for my project, they were a combination of sayings I saw on different projects I had found on Pinterest. Search around and find the quotes that you like the best from the different projects out there. This is your opportunity to really make your pallet unique to you and your outdoor space.
As you can see from this picture, I got super excited when I was done stenciling and took a picture of the pallet while it was simply leaning up against the fence, with the used stencils still laying on the ground. However, I did have my hubby attach this flat to our fence and I also applied a few coats of Thompson’s clear waterproofing sealant. 
Years later, this pallet looks as good as ever. Only one of the paint colors has started to fade and needs some touching up on the stenciling, but other than that, this pool noodle storage has been working great for our yard and was super easy and inexpensive to make.

Tuesday, June 25, 2019

It's a Great Day to be Alive

Seriously, It Is! Every Day!

I was diagnosed with breast cancer 11 days before my 36th birthday.
My best friend and I kind of have a tradition of gifting each other simple little things for our birthdays, and for my birthday this year she had filled a gift bag with little happy goodies - cute little things to make me smile, like a bag of Skittles and a bottle of Mountain Dew, to remind me of our "crazy" younger days when we would take road trips to nowhere, driving around, listening to music and fueling up on sugar and washing it down with sugar. 😄 
They were simpler times, and simple gifts, like the Skittles are always a fun reminder of these carefree days.  So, when I was diagnosed with cancer less than two weeks before my birthday, the happy little goodies in this particular gift bag became an even more special reminder of our youth and how precious the gift of life, and friendship is.

In the gift bag that year was a little solar powered dancing flower.  It had a plastic wrapper around the base, that later came off and that happy little flower was placed on my windowsill in my bedroom in hopes that it would bring a smile to my face when I was home resting after a chemotherapy treatment.  No matter how bad I was feeling on any given day, when the sun came out, that little flower would dance away to remind me how happy and vibrant it was just to be looking out my window at the world around us.

When I finished my treatments and was no longer spending days at home, the flower came with me to work, to sit on the windowsill in my office, again to remind me of how happy it was just to be there.  If ever I was feeling "a case of the Mondays" that flower would be staring at me, smiling and swaying away to some silent music that only it could hear.
I realized that that flower had a better perspective on life than most people I know.  
It didn't matter where it was or what was happening around it.  It was fueled by the 
start of each day.  All it needed was a new sunrise to keep it happy and dancing.


I decided that I wanted to put that flower somewhere different, somewhere it was sure to soak up the most sunlight possible and somewhere that I would be sure to see it every day, to remind me to be grateful for the new day I was blessed with, no matter what else was going on.  I have always loved the song "It's a Great Day to be Alive" by Travis Tritt and I imagine that is one of the songs this little flower is happily dancing along with, all alone, every day, because:
It's a great day to be alive
I know the sun's still shining
When I close my eyes
There's some hard times in the neighborhood
But why can't every day be just this good

I knew that I wanted to see this flower and this reminder, every day, no matter where I was headed or what I had going on.  And I thought, there's no better place than the dashboard of my car. The first thing I had to figure out was how to get it to stay on there without permanently affixing it, or using superglue directly on my dashboard.
Enter Scotch Fastener Tape.  I have used this tape successfully for so many projects in the past.  It is strong and sturdy, but the grip on it makes it easy to unattach and reattach whenever you need to.  I simply cut two circles out of one fastener, making sure they were small enough in diameter to fit inside the bottom indent of the flower.


I found that a nickel fit perfectly in the indent in the bottom of the flower base, but it was deep enough that I would need to stack two nickels and the Scotch fastener just to make the bottom flat enough to be secured to my dashboard.  I used the nickel as my template to cut the circles out of the fastener tape and I also cut a couple of cardboard circles the same size.
Once I had all my materials ready, I used my glue, the two cardboard circles and 
the two nickels to make the insert for the flower base.  I did it in this order:

Glue the first nickel into the bottom of the base; glue one of your 
cardboard circles onto the nickel; glue the other cardboard circle on 
to make a thicker, sturdier cardboard buffer between the two nickels; 
glue the other nickel on; attach one of your Scotch fastener circles 
to the bottom of your nickel/cardboard/nickel insert.

You should now have a flower that has a flush bottom for mounting it on to your dashboard, or wherever you choose to mount it.  Affix your other Scotch fastener circle to wherever that is and attach, or continue to unnecessarily bling out your flower first, like I did. 😏

The next step I did was to take the flower base apart.  It is actually just two plastic pieces that are clipped together around the base.  I removed them and got some spray paint ready.
Then, I brought the two pieces of the base outside and gave them a couple coats of spray paint in a pretty champagne color to complement the inside of my car.
When the spray paint had dried, I put the two pieces back together 
on the base and got ready for my next step.
Again, you could stop here as the flower looks pretty darn cute with just the spray paint on it, but I really wanted my flower to deliver my message, and a little bling.  I found this pack of stickers and the self-adhesive gems at Walmart for like $1 each and I figured they were perfect for my project.  Because the base was small and the letters were pretty big, comparatively speaking, I ended up having to use my label maker to print out a couple of the words that needed a little less attention in my message.  I did my best to make everything written out evenly, but I ended up with a little extra space on the right hand side that was kind of driving me a little batty, so I used the gems to make the flower to fill in the space.  
I also used a couple gems to make the flower's eyes sparkle, but again, not necessary.
All in all, I think she came out pretty darn cute.  She has been firmly affixed to my dashboard for a couple months now and she does not move, unless I remove her for some reason.  The stickers have also stayed put amazingly well and look handwritten.  The gems are the only thing that has not worked out as perfectly as I'd hoped.  While they are still all on the flower, on really hot, sunny days, the adhesive on the back of them tends to get a little melted and the gems do slide around a bit.  I haven't actually had one fall off, or even shift so much that it's noticeable to anyone but me, but I will definitely have to keep my eye on it as the weather gets hotter around here.  Overall, I love the way it came out and now I have a meaningful little daily reminder to be grateful for each day with me wherever I go.


-Kay


Sunday, June 16, 2019

Watermelon Strawberry Summer Refresher

This refreshingly sweet smoothie is perfect for summer days.

We love smoothies in our household and we drink them year-round.  They really are so versatile, we make them as healthy snacks, refreshing drinks to go along with a meal and even sometimes as a quick meal replacement. But sometimes you drink a smoothie and it just feels like it is meant for a specific purpose.  This is one of those smoothies.

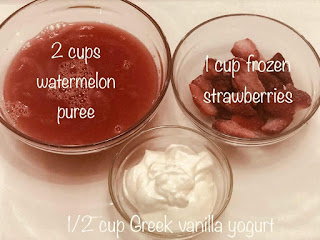
As with all of my smoothies, this is quick and easy.  Simply throw the ingredients in your blender and turn it up to high, just long enough to see that any whole fruit pieces have been pureed and all ingredients have been properly mixed.  Here are the ingredients:


In case the photo is hard to read, you will need these ingredients and I would put them in the blender in this order: 1 cup frozen strawberry pieces, 1/2 cup Greek vanilla yogurt, 2 cups watermelon puree.  And that's it!  Blend until smooth, sweet and delicious!

This smoothie just screams summer!  Maybe it's the taste of watermelon that makes you feel like you're munching on a sweet slice at a summer picnic, or maybe it's the strawberries that make you feel like you're drinking a daiquiri by the pool, but you can clearly taste each of these sweet and delicious fruits in this drink separately and yet they somehow combine to create an amazing new taste that you will want to keep drinking.  Try it and you will be hooked!  This drink would be a perfect accompaniment for a hot summer's day anywhere.  One sip and you'll be taken away  to your own summer paradise, whether that's a tropical beach somewhere or your own backyard.  Just hold the glass up to your ear and you will hear the sweet sound of summer calling.     -Kay
 

Friday, June 14, 2019

Kay's Buffalo Chicken Enchiladas

If you like buffalo chicken and enchiladas, you will love them together!

The other day, I had made a very large batch of my World Famous Buffalo Chicken and I decided that rather than freeze it for later as I usually do, I was going to try to come up with a creative new way to use it.  I already knew that my family was into different uses of buffalo chicken as we often order buffalo chicken quesadillas from our local diner and we have all enjoyed buffalo chicken pizza on occasion.  But I wanted to try something completely new and different.  I had a large package of burrito sized flour tortillas laying around from our last taco night and then I thought, why not combine two of our favorite dishes into one?  Buffalo Chicken and Enchiladas!  

Here are the ingredients I used:
  • 20 oz. Kay's World Famous Buffalo Chicken
  • 6 large burrito sized Flour Tortillas
  • 1 10 oz. can of Enchilada Sauce
  • 1 16 oz. container (2 cups) Sour Cream, plus extra for topping
  • 2 tbsp. Hidden Valley Ranch Seasoning Mix
  • 1 16 oz. package (4 cups) Shredded Cheese 
  • Shredded Lettuce for topping

This recipe really couldn't be much easier to make.  If you already have your Kay's World Famous Buffalo Chicken prepared, you're halfway there.  (How many times can I link that recipe in this post before it becomes obnoxious?  Have we already hit that point? 😬)  Anyway, you're going to want to start by preheating your oven to 350 degrees.  Then, get a large bowl and combine your sour cream with the ranch seasoning.

Next, add the buffalo chicken and 2 cups of the shredded cheese to the sour cream mixture and set aside.  Prepare a casserole dish for the enchiladas by pouring in just enough of the enchilada sauce to coat the bottom of the pan.  (This will prevent the enchiladas from burning and sticking to the casserole dish during baking.)
Evenly distribute your filling mixture between your six tortillas and roll them up.  Place them "seam side down" in your prepared casserole dish.
Top the enchiladas with the remainder of the can of enchilada sauce.
And then the remainder of the cheese.
Bake at 350 degrees for 30 minutes.
And then, because you're creating a post for your blog, and you need the plated enchilada to look pretty, resist the temptation to dig right in.  The hot enchiladas will be ooey and gooey and will fall apart if you try to lift them out of the pan before they have cooled off.  (Normally, my family skips this step.  We'll just cut a piece of enchilada, scoop it out with a spoon if necessary and enjoy.)  But, that would not look very appetizing in a picture, so I did wait for the enchiladas to properly cool before very carefully removing them to plates and choosing the prettiest, most held-together enchilada for the photo shoot.  I then topped with a little shredded lettuce and sour cream because first, it looks pretty, but second, they definitely help to cool down the heat of the buffalo and enchilada sauces used in this recipe.  I think she looks pretty, don't you?
-Kay


Friday, June 7, 2019

Kay's Simple Squash Au Gratin


My family is on a mission to be a little bit healthier.  We are by no means going on a strict diet (they never seem to work long term anyway) and as of right now, we aren't even counting our calories (it's too time consuming and I, especially am too forgetful).  But what we are trying to do is eat more healthy, well balanced meals and make better choices about what we cook and how we cook it and ultimately, what and how much we eat.

So, tonight I attempted to make a healthy"ish" (a word that I strongly believe belongs in the Webster's dictionary if it is not already) vegetarian dish for dinner.  I had picked up some small yellow squash and zucchini the last time I was at the grocery store and I knew I wanted to use them.  I also knew that I was having a serious craving for some rich and creamy alfredo sauce and I wanted to somehow incorporate that into what I was making, all while making the healthiest version possible.  Here's what I came up with.

Ingredients:
2 small zucchini

2 small yellow squash

3 tbsp. butter, divided

1 large clove of garlic, minced

1/4 cup flour

2 cups skim milk

1 cup Kraft Grated Parmesan cheese

1/4 teaspoon ground black pepper

1/4 cup Panko bread crumbs


I started with two small yellow squash and two small zucchini and my trusty little mandolin.
Next, I sliced them up really thin and using my kitchen scale, I portioned out 6oz. of each and set them aside for later.
 Now, it was time to make the alfredo sauce.  I started by melting about 2 tbsp. butter in a saucepan.
And then I added one very large clove of minced garlic to the melted butter and let it brown.
When the garlic is nice and browned, add 1/4 cup flour.
Using a whisk, mix the flour into the melted butter and garlic.  It will look like the photo below.
The next step is to add 2 cups of milk, 1/4 cup at a time, whisking well after each addition.  When all the milk has been mixed in, stir in the cup of parmesan cheese and 1/4 tsp. ground black pepper.
Now it's time to start assembling the dish.  I used a standard sized glass pie dish and spread a tablespoon of butter on the bottom and up the sides.  I then formed a layer of the slices of yellow squash around the sides of the pan.  Once the sides of the pan were lined, I continued to layer the slices of squash in a circular pattern, working my way from the outside in to the center. 
It looks so pretty, I'd like to leave it just like that.  But pretty isn't always yummy and we want this dish to be delicious, so we're going to add 1/4 cup of the alfredo sauce.
Then add the remainder of the yellow squash, layering it in a circular pattern, like you did with the first layer, this time not worrying about adding more to the sides of the pan. 
Add another 1/4 cup of the sauce and top it with a layer of the zucchini, working in the same pattern.
Top your first layer of zucchini with another 1/4 cup of the alfredo sauce.  Layer the remainder of the zucchini on top using the same method we have been all along.  Pour the remainder of the alfredo sauce on top, spreading it around evenly.
Finally, sprinkle 1/4 cup of Panko bread crumbs evenly around the top of the dish.
Bake it in the oven at 350 degrees for 30 minutes.  After the 30 minutes, increase the oven temperature to 400 degrees and cook an additional 15 minutes.  When you take it out of the oven, let it sit to cool off for at least 5-10 minutes.  Your cooked dish should look something like this.
Because squash has a lot of water in it that tends to separate when cooked, you will probably notice a lot of liquid in your dish.  Just ignore it!  This dish is really so delicious, you won't even notice the extra liquid in it.  Ready to see an up-close picture of this yummy dish?
We ate this as a light main dish, but it would probably be better as a delicious side dish for other meals.  I hope you enjoy this simple and healthy"ish" recipe.  -Kay 


Tuesday, June 4, 2019

Quick Tip Tuesday - Label Your Cake Pans

The bottom of one of  my well-used Wilton cake pans

Raise your hand if you keep the directions that come with your cake pans, telling you what size they are and how much batter you should use in them and for how long and at what temperature you should bake your cakes in them. And if you’re raising your hand right now, do you also store the direction sheet neatly near the cake pan so that it is easily accessible when you need it? Not you? Anyone you know? Anyone? No? Yeah, me neither.
Because in the timeless words of Sweet Brown: “Ain’t Nobody Got Time For That”.

That’s why I’m sharing this picture with you as part of today’s Quick Tip Tuesday. Way back when, when I first thought I was going to be one of those amazing cake decorators you see on the Food Network Challenges, I went out and bought myself some good Wilton cake pans. We are talking a good 15 years or so. (By the way, Food Network, I’m not mad at you, we can still work something out. Just give me a call.) Anyway, as I was saying, I have had most of my cake pans for a good 15 years or more. And when I first got them, I didn’t want to get rid of the directions that were stuck on them just in case I might ever need them (yes, I’m totally one of those people, a trait which makes me both endearing and annoying to my hubby). But, again, as I was saying, I knew that I wanted to keep the directions but not the sheet of paper they were on. So, I decided to grab a Sharpie and write down all the information I felt was important on the bottom of the pan. Over the years, this has come in handy for me and after all this time, this is still what the bottom of this pan looks like. The marker has begun to fade a little bit in some areas, but the pan has also been baked and washed many times. If the fading gets much worse, it will be very easy for me to touch it up, but so far I have not had to.

I hope this quick tip was helpful to you and if anybody has contact info for the Food Network, please let them know I’d like to speak to them. 🤣    -Kay

Monday, June 3, 2019

A Super Quick and Easy Campfire Cake


This cute campfire cake was decorated in under 20 minutes.

My Jack is one of the best people I know. He is always on the go, always helping somebody with something, rarely making time for himself. He doesn’t expect much and he doesn’t ask for much. That’s why when his one and only request for his birthday this year was to spend a weekend at our family’s camp, I knew I had to make it happen. And when it came time to make his birthday cake, I knew I wanted it to be just another way to make his wish come true. If you were to ask Jack, or probably anyone for that matter, the best part of camping is spending long days fishing in the lake and long nights relaxing by the campfire. So, I knew the cake needed to have both of these elements included to make it really special.

With limited time and a husband that actually prefers boxed cake mix and store bought frosting over homemade, I set out to find a quick and easy way to make a special cake for my special guy. I had some ideas in my head, but didn’t yet know exactly how I was going to accomplish them, so I headed out to the store in hopes that something would spark inspiration.

I’m really happy with the way it all came together.
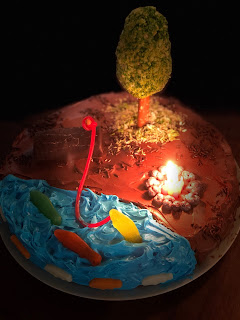
The campfire cake before lighting the “fire”

The supplies I ended up using:
  • A baked yellow cake from a boxed mix
  • A container of Pillsbury Chocolate Fudge Frosting
  • A container of Pillsbury AquaBlue Vanilla Frosting
  • Swedish Fish Candies, in both regular and mini sizes
  • A Twizzlers Pull n' Peel Candy
  • A Hostess HoHo Snack
  • 3 Original Rice Krispie Treats
  • A pretzel rod and a pretzel stick
  • A handful of Nestle Buncha Crunch Candies
  • Frosted Shredded Mini Wheats Cereal
  • Chocolate Jimmies
  • Edible Green Food Spray
  • Edible Silver Glitter Food Spray


Decorating this cake could not have been quicker or easier. I started with a single box of yellow cake mix and baked it in a 10” round cake pan. I wrapped it and let it cool overnight. I spread the chocolate frosting casually over about 2/3 of the cake. I wanted it to look like dirt so I didn’t worry about it being super smooth. When the chocolate portion was frosted, I pulled out the container of aqua blue vanilla frosting I had purchased. I frosted the remainder of the cake, this time being somewhat sloppy on purpose, pulling the frosting away from the cake with my spreader to make peaks (waves) in the “water”. I knew that I wanted to use the HoHo as a “log” you might sit on near the water to fish, so I attempted to slice some lines across it to look like tree bark, but this was only making the chocolate shell break off in pieces so I just left it as it was and set it down on the “dirt”. I had purchased a bag of Swedish Fish and a movie-theater box of Mini Swedish Fish, not quite sure as to which I would be using. I knew I wanted to have some fish floating in the water and for one of them to be “caught” on a fishing pole. Speaking of fishing poles, I made mine out of a pretzel stick and a strand of a Twizzler’s Pull n’ Peel. If I had more time I would have attempted to slice the Twizzler’s strand down the center to create a thinner “fishing line” but time just didn’t permit so I used the whole strand. I tied one end of the Pull n’ Peel around the pretzel stick fishing rod and attempted to insert the other end into the mouth of one of the regular sized Swedish Fish. (I had first poked a hole through the mouth of the fish using a toothpick.) Unfortunately, this plan didn’t work quite as I had hoped. The fish appeared as though it was going to rip apart if I put the Pull n’ Peel strand all the way through so I settled on it being just tucked into the back of the fish mouth. I stuck the back end of the fish down in the “water” and tilted his mouth upright and leaned the “ fishing pole” against the back of my “log”. To make the tree, I used a pretzel rod, 3 original Rice Krispie treats and edible green food coloring spray. I basically formed the Rice Krispie treats around one end of the pretzel rod in the shape of an oval to look like the branches/leaves and then I sprayed it with the green food coloring. I then stuck the bottom end of the “tree trunk” all the way down in the back of the cake. Next, I made the “rocks” around the campfire using Nestle Buncha Crunch sprayed with edible silver glitter spray. I simply laid them down on the cake in the shape of a circle. For the finishing touches on this cake, I first made the “grassy” circle around the tree trunk using the Shredded Frosted Mini Wheats cereal and the same green food spray I had used for the tree. Before spraying the cereal, I crushed it into small pieces and put it in a disposable bowl. I then sprayed it and poured it from the bowl around the base of the “tree”. When this was done, I sprinkled chocolate jimmies around on the “dirt” and added a couple more of the regular sized fish on the top of the "lake" and then pressed some of the mini fish into the side of the "water".  When this was all done, the last step was to put the candles into the "fire" circle.  I selected all orange and yellow candles from a multi-color pack and placed nine of them in the center of the circle in three rows of three, alternating colors as I went. I pressed them down as far as they could go into the cake and put them as close together as I could so that when they were lit, they would combine to make one large "campfire" flame instead of nine individual candle flames.  And that was it! Of all the cakes I've ever decorated, this was the quickest and easiest I've ever done and I still think it's pretty adorable. I also loved that with the exception of the candles, every single part of this cake was edible. I hope Jack loved it as much as I did.  -Kay